All Categories
-
Integrated Circuits (ICs)
Integrated Circuits (ICs)
- Interface - Sensor, Capacitive Touch(642)
- Specialized ICs(12302)
- Power Management (PMIC) - Special Purpose Regulators(5644)
- Power Management (PMIC) - Voltage Regulators - Linear Regulator Controllers(793)
- Power Management (PMIC) - Voltage Regulators - Linear + Switching(1829)
- Power Management (PMIC) - Voltage Regulators - Linear, Low Drop Out (LDO) Regulators(70981)
- Power Management (PMIC) - Voltage Regulators - DC DC Switching Regulators(39569)
- Power Management (PMIC) - DC DC Switching Controllers(13507)
- Power Management (PMIC) - Voltage Reference(9453)
- Power Management (PMIC) - V/F and F/V Converters(145)
- Power Management (PMIC) - Thermal Management(592)
- Power Management (PMIC) - Supervisors(47946)
- Power Management (PMIC) - RMS to DC Converters(170)
- Power Management (PMIC) - Power Supply Controllers, Monitors(2104)
- Power Management (PMIC) - Power Over Ethernet (PoE) Controllers(1008)
- Power Management (PMIC) - Power Management - Specialized(7722)
- Power Management (PMIC) - Power Distribution Switches, Load Drivers(7706)
- Power Management (PMIC) - PFC (Power Factor Correction)(1222)
- Power Management (PMIC) - OR Controllers, Ideal Diodes(705)
- Power Management (PMIC) - Motor Drivers, Controllers(4712)
- Power Management (PMIC) - Lighting, Ballast Controllers(560)
- Power Management (PMIC) - LED Drivers(7282)
- Power Management (PMIC) - Laser Drivers(573)
- Power Management (PMIC) - Hot Swap Controllers(2816)
- Power Management (PMIC) - Gate Drivers(7083)
- Power Management (PMIC) - Full Half-Bridge (H Bridge) Drivers(1342)
- Power Management (PMIC) - Energy Metering(654)
- Power Management (PMIC) - Display Drivers(1435)
- Power Management (PMIC) - Current Regulation/Management(1481)
- Power Management (PMIC) - Battery Management(5553)
- Power Management (PMIC) - Battery Chargers(3831)
- Power Management (PMIC) - AC DC Converters, Offline Switchers(4905)
- Memory - Controllers(358)
- Memory - Configuration PROMs for FPGAs(639)
- Memory - Batteries(13)
- Memory - Memory(65694)
- Logic - Universal Bus Functions(706)
- Logic - Translators, Level Shifters(2854)
- Logic - Specialty Logic(1870)
- Logic - Signal Switches, Multiplexers, Decoders(9420)
- Logic - Shift Registers(2665)
- Logic - Parity Generators and Checkers(335)
- Logic - Multivibrators(831)
- Logic - Latches(3658)
- Logic - Gates and Inverters - Multi-Function, Configurable(1687)
- Logic - Gates and Inverters(16453)
- Logic - Flip Flops(7780)
- Logic - FIFOs Memory(4240)
- Logic - Counters, Dividers(3456)
- Logic - Comparators(592)
- Logic - Buffers, Drivers, Receivers, Transceivers(17835)
- Linear - Video Processing(2909)
- Linear - Comparators(5084)
- Linear - Analog Multipliers, Dividers(263)
- Linear - Amplifiers - Video Amps and Modules(1905)
- Linear - Amplifiers - Special Purpose(1856)
- Linear - Amplifiers - Instrumentation, OP Amps, Buffer Amps(34236)
- Linear - Amplifiers - Audio(4567)
- Interface - Voice Record and Playback(556)
- Interface - UARTs (Universal Asynchronous Receiver Transmitter)(1237)
- Interface - Telecom(4467)
- Interface - Specialized(4833)
- Interface - Signal Terminators(333)
- Interface - Signal Buffers, Repeaters, Splitters(1449)
- Interface - Serializers, Deserializers(1480)
- Interface - Sensor and Detector Interfaces(1524)
- Interface - Modules(169)
- Interface - Modems - ICs and Modules(407)
- Interface - I/O Expanders(1136)
- Interface - Filters - Active(1226)
- Interface - Encoders, Decoders, Converters(714)
- Interface - Drivers, Receivers, Transceivers(20755)
- Interface - Direct Digital Synthesis (DDS)(117)
- Interface - Controllers(3628)
- Interface - CODECS(1676)
- Interface - Analog Switches, Multiplexers, Demultiplexers(12567)
- Interface - Analog Switches - Special Purpose(2533)
- Embedded - System On Chip (SoC)(4496)
- Embedded - PLDs (Programmable Logic Device)(971)
- Embedded - Microprocessors(10083)
- Embedded - Application Specific Microcontrollers(2275)
- Embedded - Microcontrollers(99285)
- Embedded - Microcontrollers, Microprocessor, FPGA Modules(1527)
- Embedded - FPGAs (Field Programmable Gate Array) with Microcontrollers(81)
- Embedded - FPGAs (Field Programmable Gate Array)(27747)
- Embedded - DSP (Digital Signal Processors)(4081)
- Embedded - CPLDs (Complex Programmable Logic Devices)(5187)
- Data Acquisition - Touch Screen Controllers(1210)
- Data Acquisition - Digital to Analog Converters (DAC)(14419)
- Data Acquisition - Digital Potentiometers(6250)
- Data Acquisition - Analog to Digital Converters (ADC)(17776)
- Data Acquisition - Analog Front End (AFE)(787)
- Data Acquisition - ADCs/DACs - Special Purpose(3043)
- Clock/Timing - Real Time Clocks(2446)
- Clock/Timing - Programmable Timers and Oscillators(23469)
- Clock/Timing - IC Batteries(4)
- Clock/Timing - Delay Lines(1049)
- Clock/Timing - Clock Generators, PLLs, Frequency Synthesizers(32775)
- Clock/Timing - Clock Buffers, Drivers(4568)
- Clock/Timing - Application Specific Clock/Timing(8652)
- Audio Special Purpose(1564)
Relevant Manufacturer


-
Discrete Semiconductor Products
Discrete Semiconductor Products
- Current Regulation - Diodes, Transistors(1090)
- Transistors - Special Purpose(226)
- Transistors - Programmable Unijunction(48)
- Transistors - JFETs(1558)
- Transistors - IGBTs - Single(4799)
- Transistors - IGBTs - Modules(63420)
- Transistors - IGBTs - Arrays(26)
- Transistors - FETs, MOSFETs - Single(48330)
- Transistors - FETs, MOSFETs - RF(4903)
- Transistors - FETs, MOSFETs - Arrays(6641)
- Transistors - Bipolar (BJT) - Single, Pre-Biased(4539)
- Transistors - Bipolar (BJT) - Single(25800)
- Transistors - Bipolar (BJT) - RF(2087)
- Transistors - Bipolar (BJT) - Arrays, Pre-Biased(2115)
- Transistors - Bipolar (BJT) - Arrays(2310)
- Thyristors - TRIACs(4044)
- Thyristors - SCRs - Modules(3967)
- Thyristors - SCRs(5436)
- Thyristors - DIACs, SIDACs(319)
- Power Driver Modules(1627)
- Diodes - Zener - Single(87483)
- Diodes - Zener - Arrays(2619)
- Diodes - Variable Capacitance (Varicaps, Varactors)(1200)
- Diodes - RF Diodes(2753)
- Diodes - Rectifiers - Single(67528)
- Diodes - Rectifiers - Arrays(20581)
- Diodes - Bridge Rectifiers(11700)
Relevant Manufacturer


-
RF and Wireless
RF and Wireless
- Subscriber Identification Module (SIM) Cards(77)
- RF Circulators and Isolators(1742)
- RFID, RF Access, Monitoring ICs(1550)
- RFID Transponders, Tags(747)
- RFID Reader Modules(464)
- RFID Evaluation and Development Kits, Boards(30)
- RFID Antennas(329)
- RFI and EMI - Shielding and Absorbing Materials(6444)
- RFI and EMI - Contacts, Fingerstock and Gaskets(7497)
- RF Transmitters(668)
- RF Transceiver Modules and Modems(6900)
- RF Transceiver ICs(4169)
- RF Switches(9276)
- RF Shields(16401)
- RF Receivers(1998)
- RF Receiver, Transmitter, and Transceiver Finished Units(2763)
- RF Power Dividers/Splitters(1223)
- RF Power Controller ICs(86)
- RF Modulators(710)
- RF Mixers(2800)
- RF Misc ICs and Modules(3276)
- RF Front End (LNA + PA)(419)
- RF Evaluation and Development Kits, Boards(747)
- RF Directional Coupler(2718)
- RF Multiplexers(1464)
- RF Detectors(412)
- RF Demodulators(249)
- RF Antennas(12319)
- RF Amplifiers(19651)
- Balun(1496)
- Attenuators(4852)
Relevant Manufacturer


-
Optoelectronics
Optoelectronics
- Optomechanical(480)
- Lighting Fixtures(125)
- Laser Diodes, Laser Modules - Laser Delivery, Laser Fibers(345)
- HeNe Laser Systems(31)
- HeNe Laser Heads(27)
- Display Backlights(93)
- Xenon Lighting(387)
- Touch Screen Overlays(453)
- Panel Indicators, Pilot Lights(75729)
- Remote Phosphor Light Source(269)
- Reflectors(665)
- Light Pipes(5384)
- Lenses(4951)
- Spacers, Standoffs(2718)
- Lamp Replacements(29718)
- Circuit Board Indicators, Arrays, Light Bars, Bar Graphs(9083)
- LED Thermal Products(667)
- LED Lighting Kits(64)
- LED White Lighting(37580)
- LED Color Lighting(4728)
- LED COBs, Engines, Modules, Strips(28735)
- LED Indication - Discrete(27601)
- Laser Diodes, Modules(1553)
- Incandescent, Neon Lamps(311004)
- Cold Cathode Fluorescent (CCFL) & UV Lamps(164)
- Ballasts, Inverters(7728)
- LED Emitters - Infrared, UV, Visible(3871)
- Fiber Optic Transmitters - Drive Circuitry Integrated(4085)
- Fiber Optic Transmitters - Discrete(350)
- Fiber Optic Transceiver Modules(18758)
- Fiber Optic Switches, Multiplexers, Demultiplexers(1387)
- Fiber Optic Receivers(695)
- Fiber Optic Attenuators(654)
- Electroluminescent(102)
- Display, Monitor - LCD Driver/Controller(98)
- Vacuum Fluorescent (VFD)(249)
- LED Dot Matrix and Cluster(865)
- LED Character and Numeric(5421)
- LCD, OLED, Graphic(4654)
- LCD, OLED Character and Numeric(2202)
- Display Bezels, Lenses(88)
- LED Addressable, Specialty(458)
Relevant Manufacturer


-
Sensors, Transducers
Sensors, Transducers
- Industrial Sensors - Ultrasonic Receivers, Transmitters - Industrial(115)
- Industrial Sensors - Thermostats - Mechanical - Industrial(3103)
- Industrial Sensors - Temperature Sensors - Analog and Digital Output - Industrial(209)
- Industrial Sensors - Proximity Sensors - Industrial(13611)
- Industrial Sensors - Pressure Sensors, Transducers - Industrial(26503)
- Optical Sensors - Photonics - Counters, Detectors, SPCM (Single Photon Counting Module)(751)
- Optical Sensors - Camera Modules(875)
- Industrial Sensors - Position, Proximity, Speed (Modules) - Industrial(554)
- Industrial Sensors - Force Sensors, Load Cells - Industrial(346)
- Industrial Sensors - Flow Sensors - Industrial(151)
- Industrial Sensors - Float, Level Sensors - Industrial(310)
- Industrial Sensors - Encoders - Industrial(4980)
- Industrial Sensors - Color Sensors - Industrial(50)
- Touch Sensors(100)
- Ultrasonic Receivers, Transmitters(2421)
- Temperature Sensors - Thermostats - Solid State(1096)
- Temperature Sensors - Thermostats - Mechanical(3397)
- Temperature Sensors - Thermocouples, Temperature Probes(1921)
- Temperature Sensors - RTD (Resistance Temperature Detector)(1525)
- Temperature Sensors - PTC Thermistors(2273)
- Temperature Sensors - NTC Thermistors(13259)
- Temperature Sensors - Analog and Digital Output(3928)
- Strain Gauges(1399)
- Specialized Sensors(1861)
- Solar Cells(503)
- Shock Sensors(84)
- Sensor Interface - Junction Blocks(2519)
- Sensor Cable - Assemblies(22011)
- Proximity/Occupancy Sensors - Finished Units(725)
- Proximity Sensors(2860)
- Pressure Sensors, Transducers(11317)
- Position Sensors - Angle, Linear Position Measuring(6022)
- Optical Sensors - Reflective - Logic Output(194)
- Optical Sensors - Reflective - Analog Output(432)
- Optical Sensors - Phototransistors(1027)
- Optical Sensors - Photointerrupters - Slot Type - Transistor Output(1427)
- Optical Sensors - Photointerrupters - Slot Type - Logic Output(1215)
- Industrial Sensors - Photoelectric, Industrial(16763)
- Optical Sensors - Photodiodes(1543)
- Optical Sensors - Photo Detectors - Remote Receiver(2605)
- Optical Sensors - Photo Detectors - Logic Output(146)
- Optical Sensors - Photo Detectors - CdS Cells(74)
- Optical Sensors - Distance Measuring(377)
- Optical Sensors - Ambient Light, IR, UV Sensors(1305)
- Multifunction(558)
- Motion Sensors - Vibration Sensors(337)
- Motion Sensors - Tilt Switches(67)
- Motion Sensors - Optical Motion Sensors(719)
- Motion Sensors - Inclinometers(175)
- Motion Sensors - IMUs (Inertial Measurement Units)(416)
- Motion Sensors - Gyroscopes(214)
- Motion Sensors - Accelerometers(1911)
- Magnets - Sensor Matched Magnets(119)
- Magnets - Multi Purpose Magnets(1965)
- Magnetic Sensors - Switches (Solid State)(3700)
- Magnetic Sensors - Position, Proximity, Speed (Modules)(5199)
- Magnetic Sensors - Linear, Compass (ICs)(1247)
- Magnetic Sensors - Compass, Magnetic Field (Modules)(35)
- LVDT Transducers (Linear Variable Differential Transformer)(204)
- IrDA Transceiver Modules(196)
- Optical Sensors - Image Sensors, Camera(2235)
- Humidity, Moisture Sensors(1425)
- Gas Sensors(1217)
- Force Sensors, Load Cells(188)
- Flow Sensors(550)
- Float, Level Sensors(1343)
- Encoders(6357)
- Particle, Dust Sensors(43)
- Current Sensors(3455)
- Color Sensors(85)
- Sensor, Transducer Amplifiers(1905)
Relevant Manufacturer


-
Connectors, Interconnects
Connectors, Interconnects
- USB, DVI, HDMI Connectors(446)
- Solid State Lighting Connectors(555)
- Sockets for ICs, Transistors(953)
- Pluggable Connectors(1221)
- Photovoltaic (Solar Panel) Connectors(136)
- Fiber Optic Connectors(370)
- FFC, FPC (Flat Flexible) Connectors(761)
- D-Sub, D-Shaped Connectors(2887)
- Coaxial Connectors (RF)(2389)
- Circular Connectors(14162)
- Blade Type Power Connectors(273)
- AC Power Connectors - Plugs and Receptacles(2597)
- USB, DVI, HDMI Connectors - USB, DVI, HDMI Connector Adapters(572)
- USB, DVI, HDMI Connectors - USB, DVI, HDMI Connector Assemblies(4298)
- Terminals - Wire to Board Connectors(217)
- Terminals - Wire Splice Connectors(4322)
- Terminals - Wire Pin Connectors(328)
- Terminals - Turret Connectors(1273)
- Terminals - Specialized Connectors(2042)
- Terminals - Spade Connectors(3902)
- Terminals - Solder Lug Connectors(345)
- Terminals - Screw Connectors(745)
- Terminals - Ring Connectors(12596)
- Terminals - Lugs(4747)
- Terminals - Quick Connects, Quick Disconnect Connectors(8514)
- Terminals - PC Pin, Single Post Connectors(3776)
- Terminals - PC Pin Receptacles, Socket Connectors(5883)
- Terminals - Magnetic Wire Connectors(1653)
- Terminals - Knife Connectors(112)
- Terminals - Housings, Boots(2850)
- Terminals - Foil Connectors(108)
- Terminals - Barrel, Bullet Connectors(1107)
- Terminals - Terminal Adapters(137)
- Terminal Strips and Turret Boards(1159)
- Terminal Junction Systems(2533)
- Terminal Blocks - Wire to Board(43615)
- Terminal Blocks - Specialized(3722)
- Terminal Blocks - Power Distribution(847)
- Terminal Blocks - Panel Mount(1359)
- Terminal Blocks - Interface Modules(1819)
- Terminal Blocks - Headers, Plugs and Sockets(119920)
- Terminal Blocks - Din Rail, Channel(9373)
- Terminal Blocks - Terminal Block Contacts(65)
- Terminal Blocks - Barrier Blocks(47517)
- Terminal Blocks - Terminal Block Adapters(1059)
- Solid State Lighting Connectors - Solid State Lighting Connector Contacts(271)
- Solid State Lighting Connectors - Solid State Lighting Connector Assemblies(1344)
- Sockets for ICs, Transistors - Socket Adapters(275)
- Sockets for ICs, Transistors - IC Sockets(22148)
- Shunts, Jumpers(907)
- Rectangular Connectors - Spring Loaded(7721)
- Rectangular Connectors - Rectangular Connector Housings(43023)
- Rectangular Connectors - Headers, Specialty Pin(6129)
- Rectangular Connectors - Headers, Receptacles, Female Sockets(229601)
- Rectangular Connectors - Headers, Male Pins(543338)
- Rectangular Connectors - Free Hanging, Panel Mount(30142)
- Rectangular Connectors - Rectangular Connector Contacts(10681)
- Rectangular Connectors - Board In, Direct Wire to Board(2432)
- Rectangular Connectors - Rectangular Connector Adapters(475)
- Rectangular - Board to Board Connectors - Headers, Receptacles, Female Sockets(9)
- Rectangular - Board to Board Connectors - Headers, Male Pins(2)
- Rectangular Connectors - Board Spacers, Stackers (Board to Board)(238901)
- Rectangular Connectors - Arrays, Edge Type, Mezzanine (Board to Board)(37853)
- AC Power Connectors - Power Entry Modules (PEM)(10310)
- Pluggable Connectors - Pluggable Connector Assemblies(6049)
- Photovoltaic (Solar Panel) Connectors - Photovoltaic (Solar Panel) Connector Contacts(77)
- Photovoltaic (Solar Panel) Connectors - Photovoltaic (Solar Panel) Connector Assemblies(504)
- Modular/Ethernet Connectors - Modular/Ethernet Connector Wiring Blocks(99)
- Modular/Ethernet Connectors - Modular/Ethernet Connector (RJ45, RJ11) Plugs(1674)
- Modular/Ethernet Connectors - Modular/Ethernet Connector Plug Housings(181)
- Modular/Ethernet Connectors - Modular/Ethernet Connector (RJ45) Jacks With Magnetics(10152)
- Modular/Ethernet Connectors - Modular/Ethernet Connector (RJ45, RJ11) Jacks(23416)
- Modular/Ethernet Connectors - Modular/Ethernet Connector Adapters(855)
- Memory Connectors - PC Cards - Adapters(21)
- Memory Connectors - PC Card Sockets(3299)
- Memory Connectors - Inline Module Sockets(3390)
- LGH Connectors(764)
- Keystone Connectors - Keystone Inserts(2758)
- Keystone Connectors - Keystone Faceplates, Frames(1926)
- Heavy Duty Connectors - Heavy Duty Connector Inserts, Modules(4190)
- Heavy Duty Connectors - Heavy Duty Connector Housings, Hoods, Bases(17226)
- Heavy Duty Connectors - Heavy Duty Connector Frames(523)
- Heavy Duty Connectors - Heavy Duty Connector Contacts(1832)
- Heavy Duty Connectors - Heavy Duty Connector Assemblies(671)
- Fiber Optic Connectors - Fiber Optic Connector Housings(919)
- Fiber Optic Connectors - Fiber Optic Connector Adapters(4455)
- Fiber Optic Connectors - Fiber Optic Connector Assemblies(3001)
- FFC, FPC (Flat Flexible) Connectors - FFC, FPC (Flat Flexible) Connector Housings(652)
- FFC, FPC (Flat Flexible) Connectors - FFC, FPC (Flat Flexible) Connector Contacts(202)
- FFC, FPC (Flat Flexible) Connectors - FFC, FPC (Flat Flexible) Connector Assemblies(18691)
- D-Sub, D-Shaped Connectors - D-Sub, D-Shaped Connector Terminators(47)
- D-Sub, D-Shaped Connectors - D-Sub, D-Shaped Connector Housings(12238)
- D-Sub, D-Shaped Connectors - D-Sub, D-Shaped Connector Contacts(2714)
- D-Sub, D-Shaped Connectors - D-Sub, D-Shaped Connector Backshells, Hoods(5995)
- D-Sub, D-Shaped Connectors - D-Sub, D-Shaped Connector Adapters(1304)
- D-Sub, D-Shaped Connectors - D-Sub Connector Assemblies(141346)
- D-Sub, D-Shaped Connectors - Centronics Connectors(8770)
- Contacts - Contacts, Spring Loaded (Pogo Pins), and Pressure(630)
- Contacts - Multi Purpose(6196)
- Contacts - Leadframe(122)
- Coaxial Connectors (RF) - Coaxial Connector (RF) Terminators(1231)
- Coaxial Connectors (RF) - Coaxial Connector (RF) Contacts(480)
- Coaxial Connectors (RF) - Coaxial Connector (RF) Adapters(6386)
- Coaxial Connectors (RF) - Coaxial Connector (RF) Assemblies(25734)
- Circular Connectors - Circular Connector Housings(441226)
- Circular Connectors - Circular Connector Contacts(4737)
- Circular Connectors - Backshells and Cable Clamps(53692)
- Circular Connectors - Circular Connector Adapters(8839)
- Circular Connectors - Circular Connector Assemblies(1196254)
- Card Edge Connectors - Card Edge Connector Housings(469)
- Card Edge Connectors - Edgeboard Connectors(672683)
- Card Edge Connectors - Card Edge Connector Contacts(325)
- Card Edge Connectors - Card Edge Connector Adapters(73)
- Blade Type Power Connectors - Blade Type Power Connector Housings(837)
- Blade Type Power Connectors - Blade Type Power Connector Contacts(393)
- Blade Type Power Connectors - Blade Type Power Connector Assemblies(4163)
- Between Series Adapters(649)
- Barrel Connectors - Power Connectors(935)
- Barrel Connectors - Audio Connectors(2432)
- Barrel Connectors - Barrel Connector Adapters(92)
- Banana and Tip Connectors - Jacks, Plugs(1644)
- Banana and Tip Connectors - Binding Posts(239)
- Banana and Tip Connectors - Banana and Tip Connector Adapters(75)
- Backplane Connectors - Specialized(45586)
- Backplane Connectors - Backplane Connector Housings(6863)
- Backplane Connectors - Hard Metric, Standard(6297)
- Backplane Connectors - DIN 41612(9408)
- Backplane Connectors - Backplane Connector Contacts(3583)
- Backplane Connectors - ARINC Inserts(2357)
- Backplane Connectors - ARINC(3789)
Relevant Manufacturer


-
Resistors
-
Capacitors
Capacitors
- Aluminum Capacitors(16817)
- Trimmers, Variable Capacitors(3151)
- Thin Film Capacitors(3473)
- Tantalum Capacitors(136103)
- Tantalum - Polymer Capacitors(9778)
- Silicon Capacitors(320)
- Niobium Oxide Capacitors(330)
- Mica and PTFE Capacitors(9101)
- Film Capacitors(150406)
- Electric Double Layer Capacitors (EDLC), Supercapacitors(2782)
- Ceramic Capacitors(833829)
- Capacitor Networks, Arrays(2383)
- Aluminum Electrolytic Capacitors(125325)
- Aluminum - Polymer Capacitors(7544)
Relevant Manufacturer


-
Transformers
-
Isolators
Isolators
Relevant Manufacturer


-
Crystals, Oscillators, Resonators
-
Switches
Switches
- Interlock Switches(2893)
- Emergency Stop (E-Stop) Switches(1160)
- Cable Pull Switches(571)
- Toggle Switches(33608)
- Thumbwheel Switches(742)
- Tactile Switches(14263)
- Limit Switches(28077)
- Slide Switches(5166)
- Selector Switches(9720)
- Rotary Switches(13850)
- Rocker Switches(53790)
- Pushbutton Switches - Hall Effect(127)
- Pushbutton Switches(190826)
- Programmable Display Switches(39)
- Navigation Switches, Joystick(1882)
- Magnetic, Reed Switches(1399)
- Keypad Switches(637)
- Keylock Switches(3684)
- DIP Switches(7747)
- Configurable Switch Components - Configurable Switch Lens(1435)
- Configurable Switch Components - Configurable Switch Illumination Sources(1236)
- Configurable Switch Components - Configurable Switch Contact Blocks(1401)
- Configurable Switch Components - Configurable Switch Bodies(16077)
- Disconnect Switch Components(2567)
Relevant Manufacturer


-
Relays
Relays
- Safety Relays(1310)
- Reed Relays(1735)
- High Frequency (RF) Relays(1190)
- Contactors (Solid State)(686)
- Contactors (Electromechanical)(11952)
- Automotive Relays(1881)
- Solid State Relays (SSR)(10652)
- Signal Relays, Up to 2 Amps(9149)
- Relay Sockets(2075)
- Power Relays, Over 2 Amps(31604)
- I/O Relay Modules(712)
- I/O Relay Modules - Input(2)
- I/O Relay Module Racks(247)
Relevant Manufacturer


Select Language
Current Language
English
- English
- Deutsch
- Italia
- Français
- 日本語
- 한국의
- русский
- Svenska
- Nederland
- español
- Português
- polski
- Suomi
- Gaeilge
- Slovenská
- Slovenija
- Čeština
- Melayu
- Magyarország
- Hrvatska
- Dansk
- românesc
- Indonesia
- Ελλάδα
- Български език
- Afrikaans
- IsiXhosa
- isiZulu
- lietuvių
- Maori
- Kongeriket
- Монголулс
- O'zbek
- Tiếng Việt
- हिंदी
- اردو
- Kurdî
- Català
- Bosna
- Euskera
- العربية
- فارسی
- Corsa
- Chicheŵa
- עִבְרִית
- Latviešu
- Hausa
- Беларусь
- አማርኛ
- Republika e Shqipërisë
- Eesti Vabariik
- íslenska
- မြန်မာ
- Македонски
- Lëtzebuergesch
- საქართველო
- Cambodia
- Pilipino
- Azərbaycan
- ພາສາລາວ
- বাংলা ভাষার
- پښتو
- malaɡasʲ
- Кыргыз тили
- Ayiti
- Қазақша
- Samoa
- සිංහල
- ภาษาไทย
- Україна
- Kiswahili
- Cрпски
- Galego
- नेपाली
- Sesotho
- Тоҷикӣ
- Türk dili
- ગુજરાતી
- ಕನ್ನಡkannaḍa
- मराठी
What Is an Ohmmeter
Time: April 11th, 2024
Browse: 5,429
The ohmmeter, an essential tool in electronic measurement, significantly advanced the field by making resistance, voltage, and current measurement straightforward and precise. Initially, it provided a clear, direct method for professionals and hobbyists alike to assess and troubleshoot circuits and electronic components efficiently. This tool operates on the principle of Ohm's law, enabling the calculation of a component's resistance by measuring the voltage across it and the current flowing through it. Its invention not only propelled electronic measurement technology forward but also set the stage for further innovations.
Catalog
Figure 1: Introduction to Ohm Dial
What Is an Ohmmeter?
An ohmmeter is a tool engineered for precision in measuring resistance and, under certain conditions, voltage and current in electronics. It bases its operation on Ohm's law. This law explains that current's flow through a conductor and the voltage across it are proportional, while inversely proportional to its resistance. Thus, by gauging the voltage over a component and the flow of current through it, the ohmmeter can determine that component's resistance.
The ohmmeter finds use across various fields, from electronic engineering to everyday appliance and vehicle maintenance, and in diagnosing electronics. Consider diagnosing a malfunctioning electric water heater. The technician, ensuring the appliance is powered off for safety, connects the ohmmeter's probes to the heater's terminals. The device then reads the element's resistance. Normally, the element falls within a specific resistance range; a reading outside this range suggests a fault, indicating a need for replacement.
This example illustrates the ohmmeter's role in efficient and accurate maintenance, based on direct, measurable data. Its utility extends beyond professional use; with basic instruction, electronics enthusiasts and homeowners can also employ ohmmeters for simple electrical checks and repairs, broadening its application and making it indispensable in electronic diagnostics and repair.
Application of Ohmmeter
The ohmmeter is a versatile tool in the electronics field and is widely used in maintenance, design, and education. Its role goes beyond simple resistance checks, touching on intricate aspects of electronic tasks and learning.
In Appliance Repair
Technicians often turn to ohmmeters as part of their toolkit for diagnosing household appliance issues, from refrigerators to microwaves. For instance, when a washing machine stops spinning, a technician might use an ohmmeter to test the motor's resistance. A normal reading might suggest the issue lies elsewhere, while an abnormal reading could pinpoint a burnt-out motor, guiding the repair process efficiently.
In Electronic Design
Ohmmeters are invaluable in circuit design, helping ensure that components meet the required specifications. During prototyping, continuous resistance checks can uncover design flaws early on. For example, in developing a new electronic gadget, an engineer might use an ohmmeter to verify the resistance across power connections, ensuring the device will charge as intended. This practice speeds up product development by allowing for quick corrections.
In Education
Educators use ohmmeters to bring Ohm's law to life in classrooms, demonstrating how voltage, current, and resistance interact. This hands-on approach helps students grasp theoretical concepts and apply them in practice. In advanced settings, like university labs, students employ ohmmeters in complex projects, such as building their own circuit boards, enhancing both their technical and innovative skills.
Ohmmeters bridge theory and practice in electronic technology. Their application spans from fixing appliances and shaping the next generation of electronic devices to educating future engineers, showcasing their essential role in both the professional and educational realms. Through real-world examples, the ohmmeter's versatility and practicality are evident, underlining its significance in the electronic field.
Precautions for Using Ohmmeter
Using an ohmmeter correctly involves a series of careful steps to guarantee both the accuracy of the measurements and the safety of the user. Here’s a detailed guide.
Ensure the Circuit is Power-Free
The foremost step is to make sure the circuit you’re testing is not powered. This is important for two reasons: first, to prevent damage to the ohmmeter, and second, to avoid the risk of electrical shock. Powering down involves more than just flipping a switch; it might mean unplugging the device, turning off the power supply, or even removing batteries. This step ensures a safe environment for the measurement task to the greatest extent possible.
Inspect the Ohmmeter
Before starting your measurements, a thorough check of the ohmmeter is necessary. Ensure the device's battery is charged because a low battery can skew the results, making your measurements unreliable. Also, inspect the test probes and wires. They should be in good condition without any visible damage. Damaged probes or frayed wires can lead to poor contact and thus inaccurate readings.
Probe Placement
The accuracy of your measurement significantly depends on how well you place the probes. Ensure that the probe tips are clean for a start. Dirt or oxidation can interfere with the reading. When measuring, press the probes firmly against the component, and gently twist them. This slight motion helps break through any surface layer of oxidation or grime, ensuring a solid electrical contact.
Select the Correct Measurement Range
Choosing the right range is key to getting precise measurements. While many ohmmeters automatically adjust to the correct range, manual range selection requires a bit of foresight. Starting with a broader range and narrowing down based on the initial reading can prevent overloading the meter and ensure your measurements are within a safe and accurate scale.
Successful ohmmeter use hinges on de-energizing the circuit, pre-inspection of the tool, precise probe contact, and appropriate range selection. Each step is performed to ensure maximum accuracy and safety of measurement. Following these guidelines diligently can help you avoid common mistakes and ensure that your measurements are both reliable and repeatable.
Ohmmeter Measurement Guide
When using an ohmmeter to make accurate measurements, you must follow a detailed and precise procedure in order to get an accurate reading from the ohmmeter. This means doing more than just following basic steps; it involves understanding the conditions of your measurement and analyzing results carefully. Here's a streamlined guide.
Figure 2: Resistance detection
Checking the Ohmmeter
Start by making sure your ohmmeter is ready for use. Check if the battery is charged. For devices with replaceable batteries, swap out the old one if it's running low.
Inspect the ohmmeter for any damage. Make sure the display is clear, and the probes and cables are in good condition.
Selecting the Range
Choose a measurement range that matches the expected resistance. If you're not sure, start with the highest range to avoid damaging the ohmmeter.
Use the auto-range feature if your ohmmeter has it. This simplifies the process by automatically picking the best range.
Making the Connection
Ensure the circuit you're testing is off. Connect the ohmmeter's test probe to your test object securely. Strong contact helps you avoid mistakes.
Sometimes, adjusting the probe's position helps overcome surface resistance for more reliable readings.
Reading and Recording
Once connected, read the ohmmeter's display and jot down the value. Use the data hold function, if available, for more accurate recording.
Adjusting Range and Remeasuring
If the first reading maxes out the range, switch to a more suitable range and measure again. Auto-range ohmmeters do this step automatically.
Figure 3: Low resistance tester
Analyzing Results
Compare your readings to expected values. This can tell you a lot about the condition of the component, like if there's an open circuit or if the resistance is off.
Turn off and disconnect the ohmmeter. Store it safely. If your readings suggest further issues, plan your next steps accordingly.
By sticking to this guide, you'll not only achieve more precise measurements but also keep your testing process safe and efficient. It helps in minimizing mistakes and safety hazards.
How an Ohmmeter Works
An ohmmeter measures resistance, a fundamental concept governed by Ohm's law, which is stated as V=IR. Here, V stands for voltage in volts, I for current in amps, and R for resistance in ohms. The process involves controlling and measuring the current flowing through a component and the voltage across it, enabling the calculation of its resistance.
Internal Battery
Every ohmmeter has its own battery, making it independent of external power sources. This ensures it can always provide a steady current for testing resistance.
Controlled Current Flow
The device sends a precise, small current through the component. The ohmmeter's design ensures this current is just right—strong enough for accurate measurements but weak enough to prevent damage to the component or skewed results due to excessive flow.
Measuring Voltage Drop:
As the current flows, it causes a voltage drop across the component. The ohmmeter measures this drop, a critical step in determining resistance.
Figure 4: Digital ohmmeter
Resistance Calculation
With both the current and voltage drop known, the ohmmeter uses Ohm's law to calculate resistance. This process is automated, and the resistance value is displayed directly to the user.
Automatic Range Selection
Modern ohmmeters automatically adjust their measurement range based on the component's resistance. This auto-selection simplifies use, removing the need for manual range adjustments.
Continuity Testing and More
Beyond resistance, ohmmeters can check for continuity, signaling with a sound if a circuit is complete. Higher-end models offer additional measurements, like capacitance and frequency, making them versatile tools for electronic analysis.
The ohmmeter, through its precision and advanced capabilities, embodies electrical principles and is indispensable in electronic technology. It ensures accurate resistance measurements, facilitating electronic engineering and education.
The Development History of Ohmmeter
The journey from the first ohmmeters to today's sophisticated devices encapsulates the strides made in electronic measurement technology. This transformation from simple analog instruments to the digital powerhouses of today showcases the relentless march of technological progress and innovation.
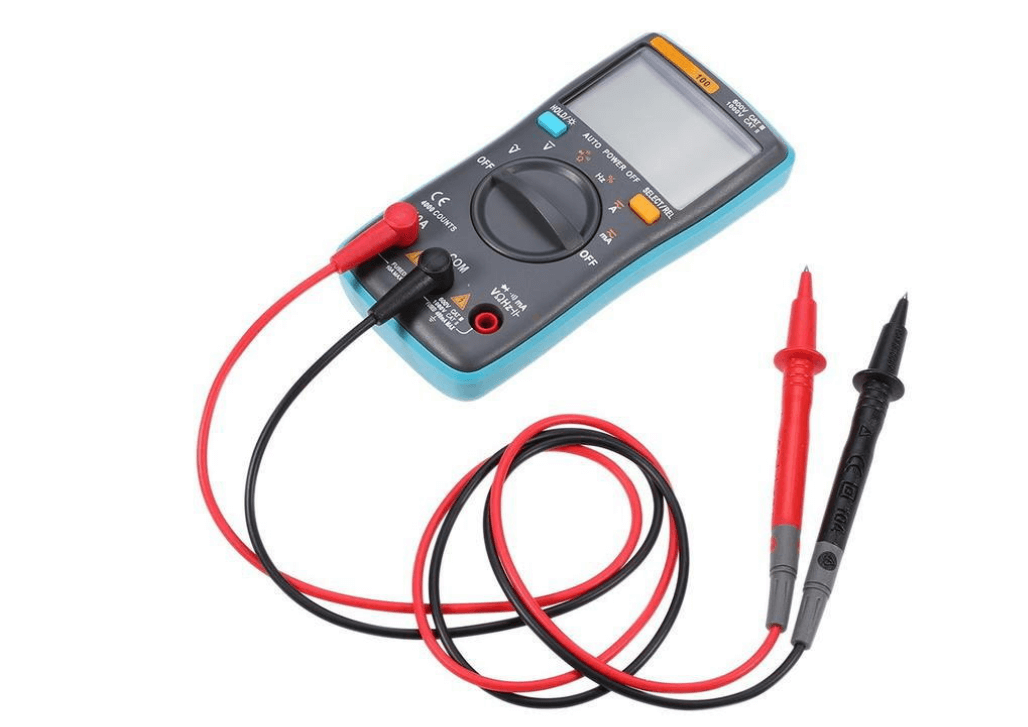
Figure 5: Ohmmeter
Initially, ohmmeters were analog, featuring a needle moving across a dial to display resistance measurements. The core of these devices was a delicate mechanism sensitive to the smallest currents passing through a resistor, nudging the needle to show the resistance value. While groundbreaking for their time, these analog meters had their drawbacks. Their accuracy depended on the user's ability to interpret the needle's position, making precise measurements challenging. The limitations weren't just about reading accuracy; ease of use and functionality were also constrained, as these devices couldn't match the detailed analysis and versatility of digital models.
The leap to digital transformed ohmmeters fundamentally. The advent of semiconductor technology and microelectronics paved the way for this shift, markedly enhancing measurement precision and repeatability. Digital ohmmeters made reading results unambiguous and straightforward, eliminating the guesswork associated with analog dials. Moreover, digital advancements allowed for features like automatic range adjustment, data logging, and connectivity options (e.g., USB, Bluetooth), broadening the ohmmeter's utility in fields such as electronic engineering, research, and education.
Today's ohmmeters are more than resistance-measuring tools; they are versatile electronic instruments. They can measure capacitance, inductance, frequency, temperature, and more, often incorporating features like signal generation and logic analysis. This multifunctionality, combined with their portability and intuitive design, makes ohmmeters invaluable to professionals and enthusiasts alike.
The history of ohmmeter development mirrors the evolution from analog simplicity to digital complexity, reflecting each technological breakthrough's impact on measurement accuracy, ease, and capabilities. As electronic technologies advance, ohmmeters will undoubtedly continue to evolve, meeting the demands of ever-more sophisticated applications and challenges.
Conclusion
Through its evolution, the ohmmeter has dramatically shifted from the analog dials of the past to today's digital displays, showcasing the leaps made in measurement technology. This change isn't just about technological advancement; it echoes the increasing demand for precision, ease of use, and a wider array of functions within electronic engineering. Modern ohmmeters, now equipped with the capabilities to measure not just resistance but also capacitance, inductance, frequency, and temperature, have become indispensable multi-functional tools. Their utility spans repairs, design, and education, broadening their impact significantly.
Diving into the workings, applications, and necessary precautions of using an ohmmeter gives us a clearer view of its practical significance and hint at the trajectory of electronic measurement technology. From the simplicity of early analog units to the sophisticated, feature-rich digital models of today, the journey of the ohmmeter is a testament to continuous innovation aimed at meeting evolving technical demands and challenges.
As technology forges ahead, expectations for the ohmmeter to deliver even more functionalities, enhanced accuracy, and a superior user experience grow. Looking forward, it's anticipated that ohmmeters will adapt and evolve, maintaining their crucial role in the ever-advancing field of electronic technology.
Frequently Asked Questions About Using an Ohmmeter
Unstable or Fluctuating Resistance Readings
If you notice that the resistance readings on your ohmmeter keep changing, it's likely due to a couple of common issues. First, check the connection between the test probes and the object you're measuring. A poor connection can lead to unstable readings. This often happens if there's dirt or an oxide layer on the object's surface, interfering with the measurement.
What to do?
Make sure the test probes are firmly touching the object. Sometimes, pressing a bit harder can ensure a better connection.
If the surface looks dirty or tarnished, give it a clean. A quick wipe can sometimes make a big difference.
Try slightly rotating or moving the probe around on the surface. This minor adjustment can sometimes establish a stronger connection and stabilize the reading.
Measurement Shows as Open Circuit or Can't be Measured
Encountering an "open circuit" reading or being unable to measure resistance at all can be frustrating. This usually means one of two things: either the resistance you're trying to measure is beyond what your ohmmeter can handle, or there's a break somewhere in the circuit you're testing.
What to do?
First, inspect all connections in your test setup to make sure everything is hooked up correctly and there are no loose wires.
If everything seems connected, try switching your ohmmeter to a higher measurement range. This can sometimes capture values outside the original setting's capability.
Double-check the circuit itself for any breaks or disconnections. A complete circuit facilitates successful measurements.
Measurements Don't Match Expectations
When the resistance measurements you're getting don't align with what you expect, the issue often lies with the setup or external influences. Choosing the wrong measurement range on your ohmmeter can lead to inaccurate readings. Additionally, the presence of other components, like resistors arranged in parallel or series, can affect the outcome.
What to do?
Review the measurement range you've selected on your ohmmeter. Adjusting this setting to better match the expected resistance value can help.
Take a closer look at the circuit configuration you're testing. Be aware of how other components might influence the measurement and adjust your expectations or calculation approach accordingly.
Ohmmeter Display Issues
When your ohmmeter doesn't show anything on the display or the display looks wrong, the most common culprit is the battery. It might be running low on power or could be completely dead. There's also a chance that something inside the meter isn't working right.
What to Do?
Start by swapping out the old battery for a new one. This simple step often fixes the issue.
Double-check that you've set the ohmmeter to the appropriate measurement mode. Incorrect settings can cause display errors.
If replacing the battery and checking the settings doesn't solve the problem, it's time to seek professional help. The device might need to be repaired by someone who knows what they're doing.
Using the Wrong Measurement Range
Selecting the wrong range for current or voltage when you're trying to measure resistance is a pretty common mistake. This usually happens because of a mix-up or not fully understanding how your ohmmeter works.
What to Do?
Take a moment to go over the instruction manual for your ohmmeter before you start measuring. Making sure you've got the right measurement range can save you a lot of headaches.
Ohmmeter Calibration Issues
An ohmmeter that's been used a lot, or used in really tough conditions, might start to drift away from accurate readings. This means it's time for a recalibration.
What to Do?
It's a good practice to send your ohmmeter back to the manufacturer or take it to a professional service center once in a while. They can recalibrate it, ensuring you get precise measurements every time.
Incorrect Use of Ohmmeter on Live Circuits
Trying to measure resistance in a circuit that's powered up can lead to all sorts of problems. Not only will your readings be off, but you could also end up damaging your ohmmeter or, worse, causing an accident.
What to Do?
Always, always make sure the circuit is completely powered down before you try to measure resistance.
Resist the temptation to use an ohmmeter on a circuit that's still life. It's not worth the risk.
By understanding these common pitfalls and how to avoid them, you can minimize mistakes and keep both your equipment and yourself safe. Remember, when in doubt, take a step back, and approach the problem methodically. Proper care and correct use of your ohmmeter will ensure accurate and reliable measurements.
Related Article
-
![Detailed Guide to Quartz Crystal Oscillators]() Apr 11 2024Detailed Guide to Quartz Crystal Oscillators
Apr 11 2024Detailed Guide to Quartz Crystal OscillatorsIn modern electronic engineering, quartz crystal oscillators are used to precisely stabilize systems. These devices, which work using the piezoelectri... -
![How To Choose the Right Boost Converter]() Apr 11 2024How To Choose the Right Boost Converter
Apr 11 2024How To Choose the Right Boost ConverterIn today's rapidly developing electronic technology field, the boost converter is a core power conversion device. Its basic function is to convert a l...
Related products

CL10C270JB8NCNC
CAP CER 27PF 50V C0G/NP0 0603
GRM033R61C393ME84D
CAP CER 0.039UF 16V X5R 0201

T495D107M016ATE125
CAP TANT 100UF 20% 16V 2917

CSD16323Q3C
MOSFET N-CH 25V 21A/60A 8SON
TL783CKCSE3
IC REG LIN POS ADJ 700MA TO220-3
LMZ10505TZX-ADJ/NOPB
DC DC CONVERTER 0.8-5V

R2A20276AFT
RENESAS TQFP/12

A12W-K
TAKAMIS DIP10
LTC3412AEUF
LTC3412 - 2.5A, 4MHZ, MONOLITHIC

M4-128/64-10VC-12VI
M4-128/64-10VC-12VI AMD

T218N10TOF
EUPEC New

XR-88C681J
